three.jsを散策する② ライトを使い影をつける
3Dグラフィックを描画できるjavascriptのライブラリthree.jsを学んでいくシリーズの2回目です。ライトを追加して影をつける方法を確認します。
ライトを使う
前回の記事で3Dオブジェクトの描画までのプロセスを確認しましたが、描画された立方体の輪郭がはっきりせず見栄えがいまいちだったのでライトを追加していきます。フォルダ構成とベースとなるindex.htmlとmain.jsは以下のようになります。
threejsProject
  ├ index.html
  └ main.js
index.html
<!DOCTYPE html>
<html>
  <head>
    <title>three.js app</title>
    <script async src="https://unpkg.com/es-module-shims@1.6.3/dist/es-module-shims.js"></script>
    <script type="importmap">
     {
       "imports": {
	 "three": "https://unpkg.com/three@v0.155.0/build/three.module.js",
	 "three/addons/": "https://unpkg.com/three@v0.155.0/examples/jsm/"
       }
     }
    </script>
  </head>
  <body>
    <div id="target"></div>
    <script type="module" src="main.js"></script>
  </body>
</html>
main.js
import * as THREE from 'three';

const width = 300;
const height = 200;

const scene = new THREE.Scene();
const camera = new THREE.PerspectiveCamera(75, width/height, 0.1, 1000);//カメラ

const renderer = new THREE.WebGLRenderer();
renderer.setSize(width, height);
document.getElementById('target').appendChild(renderer.domElement);

const geometry = new THREE.BoxGeometry(1, 1, 1);
const material = new THREE.MeshBasicMaterial({color: 0x00ff00});
const cube = new THREE.Mesh(geometry, material);
scene.add(cube);

camera.position.z = 3;

function animate() {
    requestAnimationFrame(animate);

    cube.rotation.x += 0.01;
    cube.rotation.y += 0.01;

    renderer.render(scene, camera);
}

animate();
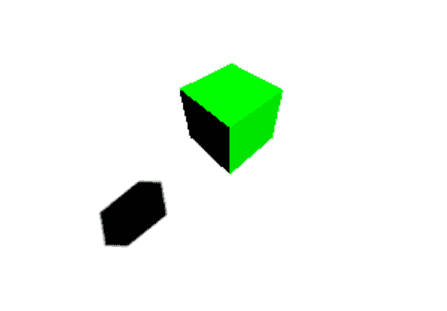
描画はこんな感じです。

それではライトを追加していきます。今回はDirectionalLight(平行光源)を使用します。コンストラクタは下記のようになっています。
DirectionalLight( color : Integer, intensity : Float )
color(色)のデフォルトは0xffffff、intensity(強さ)のデフォルトは1となっているので必要に応じて調整します。main.jsのscene.add(cube);の下に下記の記述を追加します。
const light = new THREE.DirectionalLight(0xffffff, 6.0);
light.position.set(2, 2, 2);
scene.add(light);
また、cube(立方体)のマテリアルに指定しているMeshBasicMaterialはライトの影響が反映されないマテリアルのため、MeshPhongMaterialに変更します。
影をつける
ライトの効果がわかりやすいように背景に影をつけてみます。まず背景を白くします。const scene = new THREE.Scene();の下に下記の記述を追加します。
scene.background = new THREE.Color(0xffffff);
次に影が映る土台(平面)を作成します。PlaneGeometryを使用します。scene.add(cube);の下に下記の記述を追加します。
const planeGeometry = new THREE.PlaneGeometry(100, 100);
const planeMaterial = new THREE.MeshLambertMaterial({color: 0xffffff});
const plane = new THREE.Mesh(planeGeometry,planeMaterial);
plane.position.set(0, 0, -3);
plane.receiveShadow = true;
scene.add(plane);
影が映るようにするにはreceiveShadowプロパティをtrueにしておく必要があります。また、影の表示に影響するレンダラー、キューブ、ライトのcastShadowプロパティをtrueにする必要があります。これまでの変更をまとめるとmain.jsは以下のようになります。
import * as THREE from 'three';

const width = 300;
const height = 200;

const scene = new THREE.Scene();
scene.background = new THREE.Color(0xffffff);

const camera = new THREE.PerspectiveCamera(75, width/height, 0.1, 1000);

const renderer = new THREE.WebGLRenderer();
renderer.shadowMap.enabled = true;
renderer.shadowMap.type = THREE.PCFSoftShadowMap;
renderer.setSize(width, height);
document.getElementById('target').appendChild(renderer.domElement);

const geometry = new THREE.BoxGeometry(1, 1, 1);
const material = new THREE.MeshPhongMaterial({color: 0x00ff00});
const cube = new THREE.Mesh(geometry, material);
cube.castShadow = true;
scene.add(cube);

const planeGeometry = new THREE.PlaneGeometry(100, 100);
const planeMaterial = new THREE.MeshLambertMaterial({color: 0xffffff});
const plane = new THREE.Mesh(planeGeometry,planeMaterial);
plane.position.set(0, 0, -3);
plane.receiveShadow = true;
scene.add(plane);

const light = new THREE.DirectionalLight(0xffffff, 6.0);
light.position.set(2, 2, 2);
light.castShadow = true;
scene.add(light);

camera.position.z = 3;

function animate() {
    requestAnimationFrame(animate);

    cube.rotation.x += 0.01;
    cube.rotation.y += 0.01;

    renderer.render(scene, camera);
}

animate();
これでライトを使い、影をつけることができました。